
Last Updated: August 3, 2026
Reading Time: 10 minutes
Prepared by: Basta Vape Editorial Team
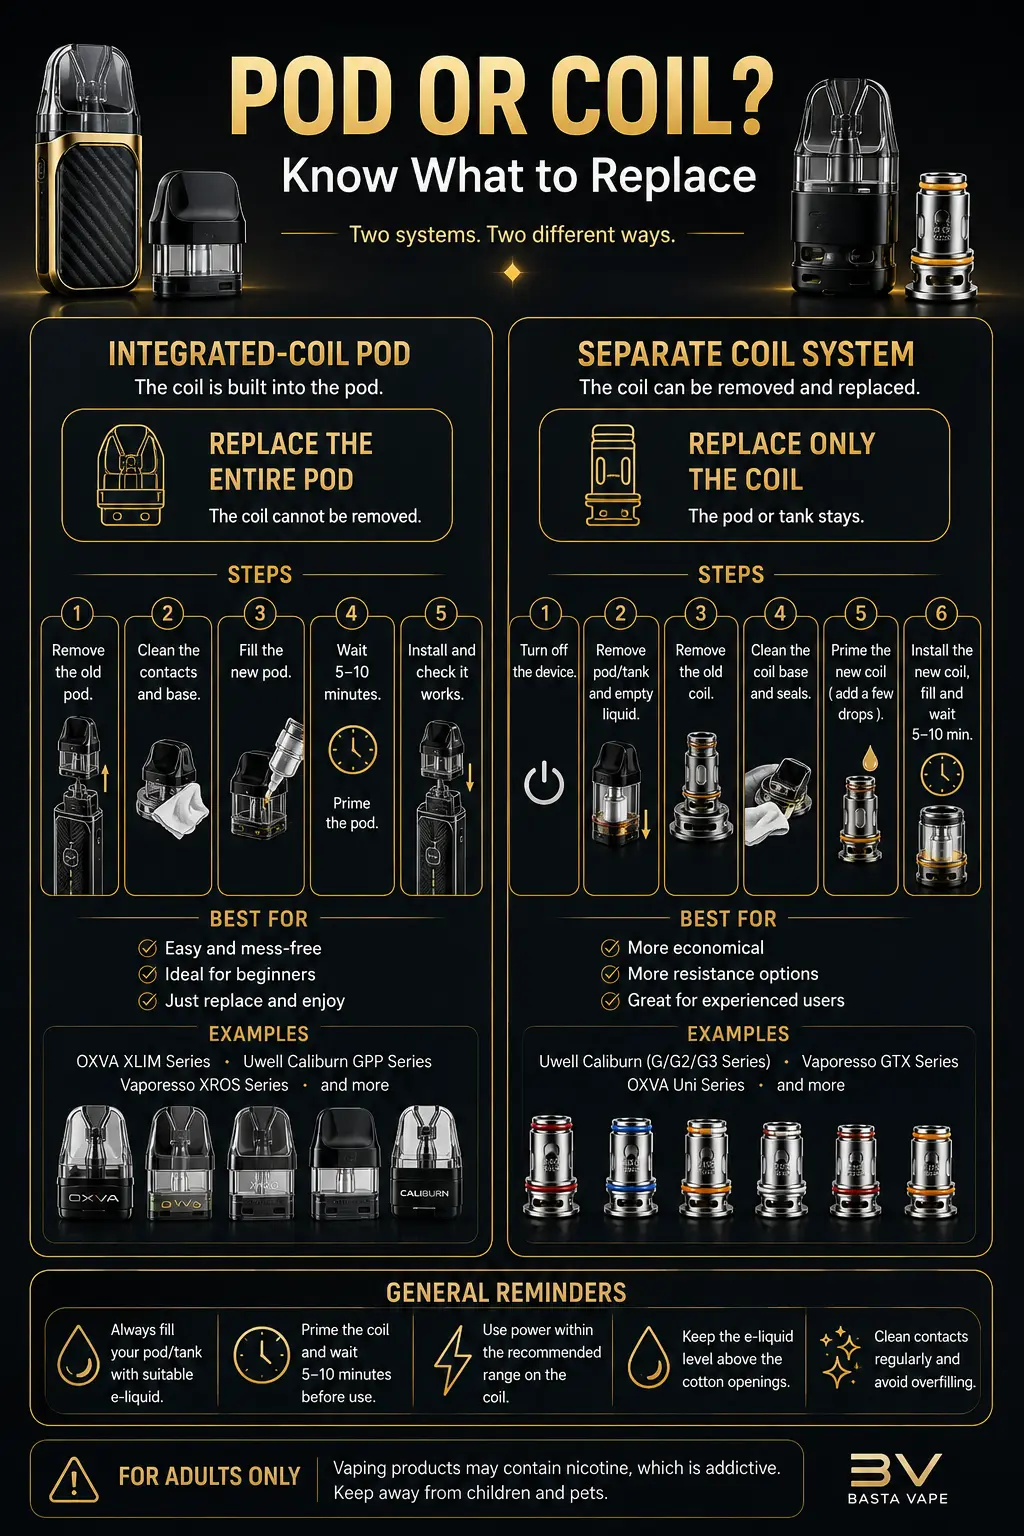
“Changing a vape coil” can mean two different things: replacing the entire pod when the coil is built into it, or removing and replacing a separate coil inside a pod or tank.
The first step is therefore to identify which system your device uses before buying a replacement part or trying to remove anything.
Some devices use sealed pods with integrated coils that are not designed to be removed. Other systems allow the coil to be replaced while the pod or tank remains in use. Installation, filling and coil-priming instructions can differ between devices, so the manufacturer’s manual should always be your main reference.
Quick Answer
Replace the coil or pod when you notice a persistent burnt taste, a clear decline in flavor or vapor production, or repeated leaking that continues after cleaning the device and confirming that it has been filled correctly.
Before replacing anything:
- Confirm whether the device uses an integrated-coil pod or a separate coil
- Choose a replacement compatible with the exact device and model
- Fill the new pod or tank with a suitable e-liquid
- Allow the cotton to absorb the liquid before use
- Begin within the power range printed on the coil or recommended in the device manual
Once the cotton inside a coil has burnt, continuing to use it will not normally solve the problem. Replace it with a compatible new coil or pod.
Quick Summary
- An integrated coil means replacing the complete pod
- A separate coil can be removed from the pod or tank
- A persistent burnt taste is one of the clearest signs that replacement is needed
- Weak flavor and reduced vapor can also indicate coil wear
- Clean the contact points before installing the new part
- Never activate a new coil while its cotton is dry
- Allow enough time for the cotton to absorb the liquid
- Do not exceed the power range shown on the coil
- Do not force or overtighten replacement parts
- There is no single fixed lifespan for every vape coil
Table of Contents
- Should You Replace the Coil or the Complete Pod?
- Signs That a Vape Coil Needs Replacing
- What You Need Before Starting
- How to Replace an Integrated-Coil Pod
- How to Replace a Separate Vape Coil
- How to Prime a New Coil
- What to Do After Installation
- Common Coil-Replacement Mistakes
- How to Fix Leaking After a Coil Change
- How to Fix “No Atomizer” or “Check Atomizer”
- How Long Does a Vape Coil Last?
- How to Extend Coil Life
- Frequently Asked Questions
Should You Replace the Coil or the Complete Pod?
This is the most important step in the process.
Integrated-Coil Pod
In this system, the coil is permanently built into the pod and is not intended to be removed.
When the coil reaches the end of its usable life:
Many modern OXVA XLIM, Vaporesso XROS and Uwell Caliburn GPP pods use integrated coils.
Do not attempt to open the base or pull the metal section out of an integrated pod. Doing so may damage its seal and cause leaking.
Pod or Tank with a Separate Coil
With this system, the pod or tank remains in use while the old coil is pulled out or unscrewed and replaced with a new one.
Depending on the design, the coil may:
- Pull directly out of the pod
- Unscrew from the base
- Become accessible after removing the tank base
The tank or pod may need to be emptied before the coil is removed.
Disposable Device
Most disposable devices are not designed to be opened or to have their coils replaced by the user.
When the liquid, battery or coil reaches the end of its usable life, the device should be disposed of according to local electronic-waste and battery guidance rather than dismantled.
Signs That a Vape Coil Needs Replacing
Do not wait until the device completely stops working. Look for changes in flavor, vapor and general performance.
1. Persistent Burnt Taste
A dry or burnt taste can appear when the cotton inside the coil becomes damaged.
Before deciding that the coil has failed, confirm that:
- There is enough liquid in the pod or tank
- The power is not set too high
- The coil was given enough time to absorb the liquid
- You are not taking repeated draws too quickly
When the burnt taste continues after these checks, the coil probably needs replacing.
2. Noticeably Weaker Flavor
The device may continue producing vapor while the flavor becomes weak, muted or different from normal.
A clear and lasting decline in flavor is one of the most common signs of coil wear.
3. Reduced Vapor Production
If vapor output has dropped noticeably, first confirm that:
- The battery is charged
- The airflow is not blocked
- The liquid level is sufficient
- The device is operating within the correct power range
If these are normal, residue may have accumulated on the coil and cotton.
4. Repeated Leaking
A small amount of condensation does not always mean that the coil has failed.
However, a damaged, incorrectly installed or heavily flooded coil can allow excess liquid to enter the airflow channel.
Check the filling method and installation before replacing the coil.
5. Liquid Darkening Quickly
E-liquid can gradually become darker during normal use.
However, rapid darkening combined with weak flavor or an unusual taste may indicate that residue has accumulated inside the coil.
6. Unusual Sounds
Light crackling can be normal with some devices.
Loud gurgling accompanied by liquid reaching the mouth can indicate that too much liquid has entered the coil or airflow channel.
This does not always mean the coil has expired, but the device should be cleaned and inspected.
7. Device Error Messages
The device may display messages such as:
- No Atomizer
- Check Atomizer
- No Load
- Short Circuit
- Resistance Too Low
- Resistance Too High
These messages do not necessarily mean that the coil is burnt. The problem may involve wet contacts, poor installation, an incompatible part or an unsuitable resistance.
What You Need Before Starting
Prepare the following:
- A genuine compatible pod or coil
- E-liquid suitable for the device
- A clean, dry tissue
- A clean and stable work surface
- The device manual or manufacturer’s instructions
- Gloves when necessary, particularly when cleaning a leak
Do not place sharp metal tools inside the device or near battery contacts, and never force an incompatible part into position.
How to Replace an Integrated-Coil Pod
This method applies to many modern refillable pod systems.
Step 1: Switch Off or Lock the Device
When the device has a firing button, switch it off or lock it before removing the pod.
For draw-activated devices without a firing button, place the device on a stable surface and keep liquid or metal tools away from the contacts.
Step 2: Remove the Old Pod
Pull the pod gently upward.
Avoid forcing it from side to side when it feels tight, as this may place unnecessary pressure on the magnets or contact pins.
Step 3: Clean the Pod Compartment
Use a dry tissue to clean:
- The bottom of the old pod
- The metal contact points
- The pod compartment
- Condensation around the airflow openings
Do not immerse the device body in water.
Step 4: Inspect the New Pod
Confirm that:
- It belongs to the correct pod platform
- It has the intended resistance
- It is not cracked or damaged
- Any protective sticker underneath has been removed
- The filling seal closes correctly
Some new pods include a protective sticker over their electrical contacts that must be removed before use.
Step 5: Fill the New Pod
Open the filling port according to the manufacturer’s instructions.
The filling port may be:
- On the top under a removable cap
- On the side behind a silicone plug
- Under the pod mouthpiece
Insert the e-liquid bottle tip into the filling port, not the central airflow channel.
Leave a small amount of air space rather than filling the pod completely to the edge.
Step 6: Close the Pod and Wait
Close the filling port securely and allow the pod to stand while the cotton absorbs the liquid.
Manufacturer instructions vary. Some devices require around five minutes, while others recommend approximately ten minutes.
When no clearer instruction is available, allowing 5 to 10 minutes is a practical general guideline.
Step 7: Reinstall the Pod
Insert the pod in the correct direction without applying excessive pressure.
When the device has a display, confirm that it detects the pod and shows a reasonable resistance reading.
How to Replace a Separate Vape Coil
Exact steps vary between pod and tank designs, but the general process is similar.
Step 1: Switch Off the Device
Switch off the device and remove the tank or replaceable-coil pod from the battery section.
Step 2: Empty the Liquid When Necessary
Many systems should be empty before the coil is removed.
Removing a coil from a full tank can cause liquid to escape through the coil opening.
Step 3: Remove the Old Coil
The coil may be removed by:
- Pulling it directly from the pod base
- Unscrewing it counterclockwise
- Removing the tank base before pulling it out
When the coil is difficult to grip, use a dry tissue rather than excessive force or a sharp tool.
Step 4: Clean the Coil Base
Wipe:
- The coil chamber
- Threaded metal sections
- Airflow openings
- Residual liquid
- Electrical contact points
Inspect the rubber sealing rings and confirm that none are damaged, twisted or missing.
Step 5: Inspect and Prepare the New Coil
Confirm that the replacement:
- Matches the device, pod or tank
- Has undamaged sealing rings
- Is not bent or deformed
- Shows a clear recommended power range
For a separate coil, a few drops of e-liquid can be placed onto the visible cotton openings before installation.
Do not pour liquid into the central airflow tube.
Step 6: Install the New Coil
For push-fit coils:
- Align any flat sides or positioning guides
- Push the coil in until it sits completely flush
For threaded coils:
- Begin tightening it by hand
- Stop once it is securely seated
- Do not use tools to overtighten it
Excessive tightening can damage threads and sealing rings or make the coil difficult to remove later.
Step 7: Reassemble the Pod or Tank
Check that all components and seals are correctly positioned before filling.
Step 8: Fill and Wait
Fill the pod or tank, close the filling port and allow the cotton enough time to absorb the liquid before activating the device.
How to Prime a New Coil
Priming means allowing the cotton inside a new coil to become fully saturated with e-liquid before it is heated.
Why Is Priming Important?
When a new coil is activated while the cotton is still dry, the cotton can burn during the first draw.
Once the cotton has burnt, the unwanted taste may remain even after the coil becomes saturated.
Correct Priming Method
- Apply a small amount of liquid to the visible cotton openings when using a separate coil
- Install the coil
- Fill the pod or tank
- Close the filling port
- Wait for the period recommended by the manufacturer
- When the device has adjustable power, begin at the lower end of the coil’s supported range
- Increase power gradually without exceeding the printed maximum
Some modern devices include their own automatic priming or coil-protection systems. Follow the manufacturer’s instructions rather than assuming that every system should be prepared in exactly the same way.
What to Do After Installation
After the waiting period:
- Confirm that there is no liquid underneath the pod
- Install the pod or tank
- Switch on the device
- Check the displayed resistance when available
- Confirm that the power setting is suitable
- Begin with short, gentle draws
- Watch for leaking, unusual sounds or a dry taste
If the flavor feels dry, stop and allow more time rather than continuing to use the device.
Common Mistakes When Changing a Coil
Activating the Coil Immediately After Filling
The cotton may burn before it has absorbed enough liquid.
Filling the Airflow Channel
The central opening is not a filling port.
Liquid entering it may cause gurgling, leaking or liquid reaching the mouth.
Buying a Pod Based Only on Its Shape
Similar appearance does not guarantee compatibility.
Always check the complete device name, pod family and resistance.
Failing to Install the Coil Completely
A partially installed coil may cause:
- Leaking
- Unstable resistance readings
- Failure to detect the coil
- Irregular airflow
Overtightening the Coil
Overtightening does not necessarily prevent leaking and can damage threads or seals.
Exceeding the Supported Power Range
Check the figures printed on the coil or listed in the manufacturer’s manual.
Allowing the Liquid Level to Become Too Low
Keep the coil’s cotton openings covered with liquid during use.
Taking Draws Too Close Together
Repeated draws without enough time between them can prevent the cotton from absorbing fresh liquid, particularly at higher power.
How to Fix Leaking After a Coil Change
Check the following in order:
- Is the coil or pod compatible with the device?
- Is the coil fully installed?
- Are the sealing rings intact?
- Is the filling port securely closed?
- Has the pod or tank been overfilled?
- Did liquid enter the airflow channel?
- Is the pod cracked?
- Is the liquid suitable for the device?
- Has the device been exposed to high temperatures?
- Is the moisture only normal condensation?
Clean the liquid and reinstall the part carefully once.
If leaking continues with a new pod or coil, try another genuine replacement to determine whether the first part has a sealing defect.
How to Fix “No Atomizer” or “Check Atomizer”
Try the following:
- Switch off the device
- Remove the pod or tank
- Dry the contact points
- Confirm that any protective sticker has been removed
- Reinstall the coil completely
- Check that the contact points are not bent or damaged
- Try another compatible pod or coil
- Restart the device
- Check the manual for the exact meaning of the error
The device’s protection system may stop activation when it cannot detect the coil or when the resistance or electrical connection appears unsuitable.
Stop using the device when:
- It becomes unusually hot
- A burnt smell comes from the device body
- Liquid enters the charging port
- A short-circuit warning continues
- The device has been significantly dropped or damaged
How Long Does a Vape Coil Last?
There is no single guaranteed lifespan for every coil.
Actual coil life depends on:
- The pod or coil design
- Operating power
- Frequency and length of draws
- E-liquid ingredients and sweetness
- Coil resistance
- Liquid level
- Priming method
- Storage temperature
- Device cleanliness
Do not replace a coil only because a fixed number of days has passed.
Replace it when the flavor, vapor or performance clearly changes, or when the manufacturer recommends replacement.
How to Extend Coil Life
Prime It Before Use
Never activate a new coil while the cotton is dry.
Stay Within the Correct Power Range
Use the wattage range shown on the coil or recommended by the device.
Maintain the Liquid Level
Do not allow the pod or tank to become completely empty.
Leave Time Between Draws
This is particularly important with higher power or thicker liquids.
Clean Condensation
Regularly wipe the bottom of the pod and the device contacts.
Avoid High Temperatures
Do not leave the device in a closed vehicle or in direct sunlight.
Use Genuine Compatible Parts
Correctly manufactured compatible pods and coils reduce the risk of poor sealing, incorrect fit and unstable resistance readings.
Close the Filling Port Securely
An incomplete seal can allow air to enter and liquid to leak.
Can a Vape Coil Be Cleaned and Reused?
An empty tank or pod may be cleaned according to the manufacturer’s instructions, but cleaning a used coil does not reliably return it to its original condition.
When the cotton has burnt, rinsing usually cannot remove the burnt taste.
A coil should not be washed and immediately reactivated while wet. It should also not be opened or rebuilt unless it is specifically designed as a rebuildable system and is being handled by an experienced user.
For most users, replacing a worn or burnt coil with a compatible new part is the clearer and more reliable solution.
Frequently Asked Questions
How Can I Tell Whether a Coil Has Burnt?
The clearest sign is a persistent burnt taste that remains after checking the liquid level, power setting and priming time.
Should I Replace the Coil or the Complete Pod?
Replace the complete pod when the coil is integrated. Replace only the coil when it is a separate removable part according to the device instructions.
How Long Should I Wait After Installing a New Coil?
Follow the device manual. Many manufacturers recommend around five minutes, while some recommend approximately ten minutes after filling.
Can I Use the Coil Immediately After Adding a Few Drops?
No. A few drops help prepare a separate coil, but the pod or tank should still be filled and left long enough for the cotton to become fully saturated.
Why Does the New Coil Still Taste Burnt?
Possible causes include:
- Activating it too soon
- Excessive power
- Incompatible liquid
- Insufficient liquid reaching the cotton
- Incorrect installation
- A defective or incompatible replacement
Why Is the New Pod Leaking?
Check the filling seal, pod installation, sealing rings, overfilling and whether liquid entered the central airflow channel.
Should I Replace the E-Liquid When Changing the Coil?
Not always.
However, when the remaining liquid is very dark or carries a burnt taste, cleaning the tank and using fresh liquid can prevent that flavor from affecting the new coil.
Does Lower Resistance Mean a Better Coil?
No. Each resistance is intended for a different power range and style of use.
The correct choice is the resistance compatible with the device and the user’s intended setup.
Can a Burnt Coil Be Repaired?
Once the cotton has burnt, replacement is the practical solution for most users.
Why Does the Device Not Detect the New Coil?
The contacts may be wet, the coil may not be fully installed, the replacement may be incompatible, or the pod base or device may be damaged.
Conclusion
Correct coil replacement begins by identifying the type of system:
Clean the device, install a compatible replacement, fill it with suitable liquid, allow the cotton to absorb the liquid and begin within the correct power range.
Do not wait until the device completely stops working. A persistent burnt taste, weak flavor, reduced vapor and repeated leaking are all signs that the coil or pod should be inspected and may need replacement.
Read Also
- Best Vape Devices for Beginners
- How to Choose Your First Vape Device
- Nicotine Salt vs Freebase
- Browse Pods and Coils at Basta Vape
Choose replacement parts using the exact device name, model and resistance rather than appearance alone.
Important Notice
This content is educational and intended for adults only.
Vaping products are not risk-free, and e-liquids may contain addictive nicotine. Keep devices, liquids, pods and coils away from children and pets. Wash exposed skin if it comes into contact with e-liquid and follow the manufacturer’s instructions.