
Last updated: August 3, 2026
Estimated reading time: About 17 minutes
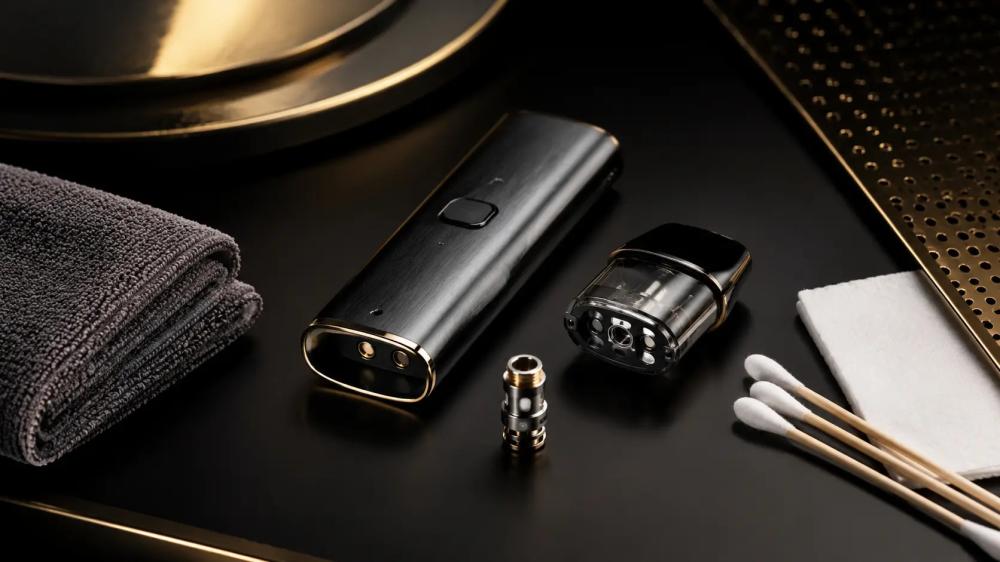
Regular cleaning helps remove condensation and e-liquid residue from beneath the pod and around the contact points. It may also reduce connection problems, gurgling and what appears to be leaking.
However, each part requires a different cleaning method. The device body and battery must remain dry, while some removable tanks and non-electronic parts may be rinsed only when the manufacturer’s instructions permit it.
Before you clean
Never immerse a vape device in water, use strong chemical cleaners or reinstall a washed component before it is completely dry.
Quick Answer
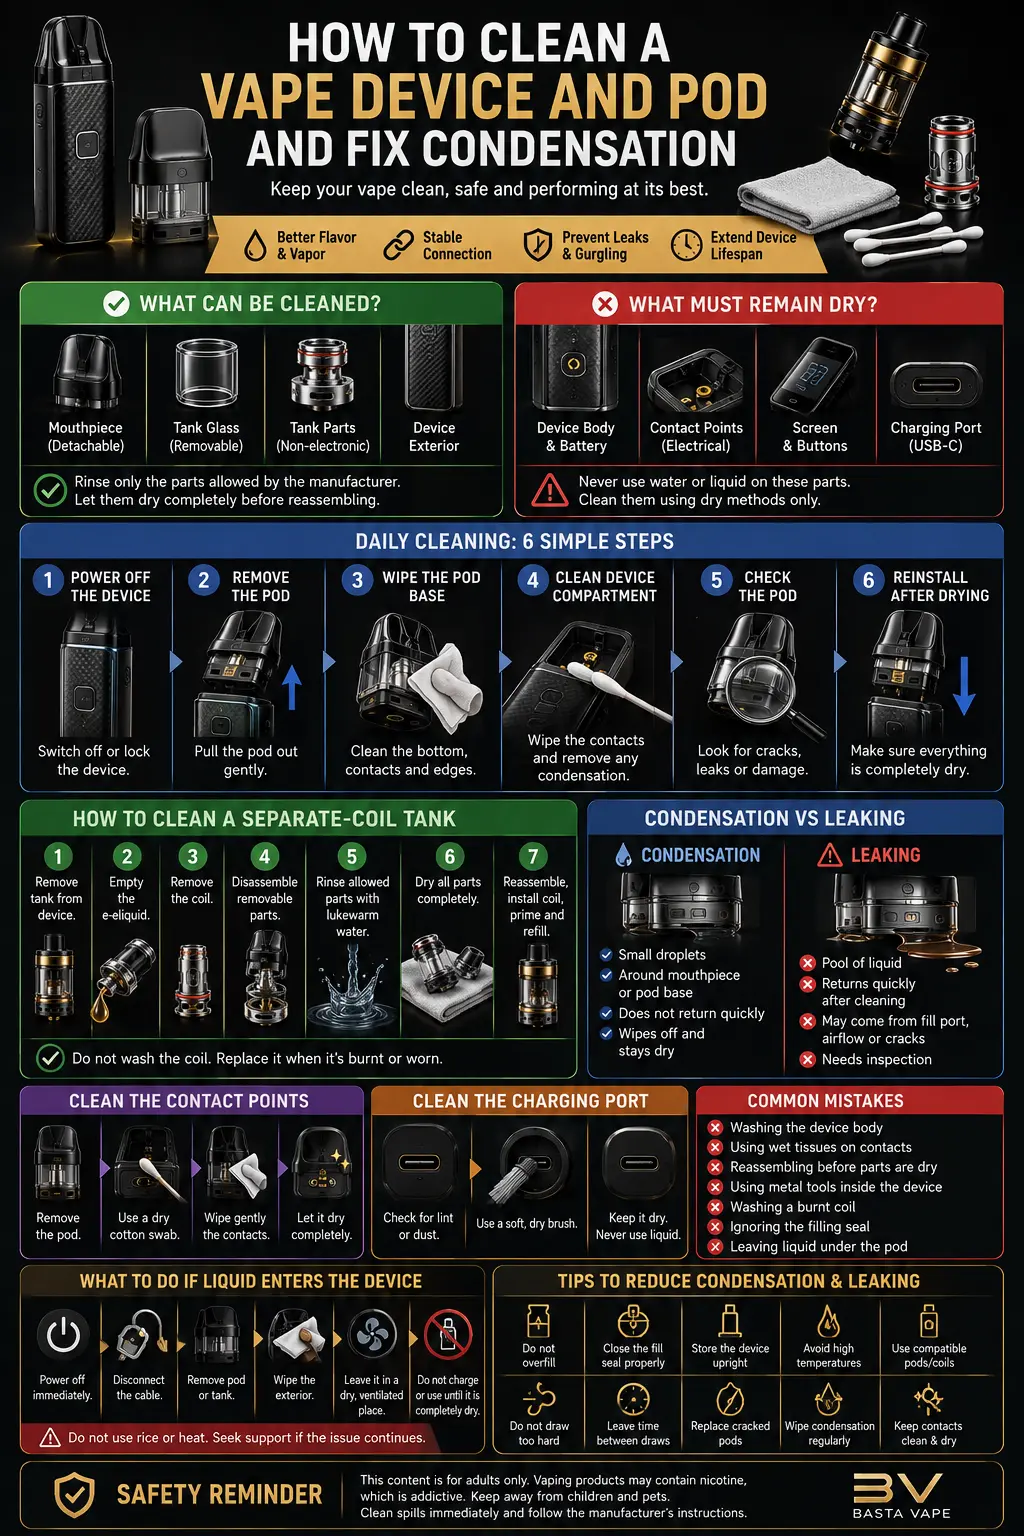
To clean a vape device properly:
- Switch off or lock the device
- Remove the pod or tank
- Wipe the bottom of the pod and the device compartment with a dry tissue
- Clean the contact points gently with a dry cotton swab
- Wipe the mouthpiece and exterior of the device
- Inspect the pod for cracks, damage or continued leaking
- Allow every component to dry completely before reassembly
- Keep water away from the battery, screen, buttons and charging port
A few droplets beneath the pod may be caused by normal condensation, particularly around the mouthpiece or airflow channel. Liquid that repeatedly collects around the pod base or battery contacts may indicate a problem with the filling seal, pod installation or the pod itself.
On this page
- Why Does a Vape Device Need Cleaning?
- What Is the Difference Between Condensation and Leaking?
- Suitable Cleaning Tools
- Parts That Must Remain Dry
- Quick Daily Cleaning Method
- How to Clean the Device Body
- How to Clean the Pod Compartment and Contact Points
- How to Clean the Mouthpiece and Airflow Channel
- How to Clean an Integrated-Coil Pod
- How to Clean a Separate-Coil Pod or Tank
- Can a Vape Coil Be Cleaned?
- How to Clean the Charging Port Safely
- What to Do If Liquid or Water Enters the Device
- How Often Should You Clean a Vape Device?
- Common Cleaning Mistakes
- How to Reduce Condensation and Leaking
- Frequently Asked Questions
- Conclusion
- Quick Summary
Why Does a Vape Device Need Cleaning?
Small amounts of moisture or e-liquid can collect in several areas during normal use, including:
- Beneath the pod
- Around the electrical contacts
- Inside the mouthpiece
- Near the airflow openings
- Around the filling seal
- On the exterior of the device
A buildup of residue may cause:
- An unstable connection between the pod and device
- Gurgling sounds
- E-liquid droplets entering the mouthpiece
- Staining inside a pocket or bag
- Difficulty distinguishing normal condensation from a genuine leak
- Errors such as “Check Atomizer” on some devices
Keeping the pod base and device contacts clean and dry can help the device detect the pod or coil correctly.
What Is the Difference Between Condensation and Leaking?
Condensation and leaking can look similar, but they are not always the same problem.
Condensation
When vapor cools inside the mouthpiece or airflow channel, a small amount may turn back into liquid droplets.
Condensation commonly appears as:
- A light layer of moisture beneath the pod
- Small droplets around the mouthpiece
- A limited amount that does not increase quickly
- Moisture that disappears after wiping and does not immediately return
A small amount of condensation can be normal during regular use.
Leaking
A wider inspection is needed when you notice:
- A noticeable pool of liquid beneath the pod
- Liquid returning quickly after cleaning
- E-liquid escaping from the filling port
- A crack in the pod body
- Liquid leaving through the airflow openings
- Contact points remaining wet
- The liquid level falling without corresponding use
- E-liquid reaching the device body or charging port
Leaking may be caused by an open or damaged filling seal, incorrect installation, overfilling, damaged sealing rings, exposure to heat or a cracked pod.
Suitable Cleaning Tools
Prepare the following:
- Dry paper tissues
- A soft, lint-free cloth
- Dry cotton swabs
- A small container for removable components
- Lukewarm water for parts that the manufacturer allows to be rinsed
- Gloves when handling a larger e-liquid spill
- The device manual or manufacturer’s instructions
Tools and Materials to Avoid
Do not use:
- Sharp metal tools inside the device
- Strong chemical cleaners
- Fragrances or scented cleaning products
- Abrasive materials
- Large amounts of water near the device
- A wet tissue inside the charging port
- Direct heat or a very hot hair dryer
- High-pressure air that may push liquid farther inside the device
Parts That Must Remain Dry
Not every component of a vape device can be washed.
Do Not Wash with Water
Keep these parts dry:
- The device body containing the battery
- The screen
- The buttons
- Electrical contact points
- The USB-C or charging port
- Battery ventilation openings
- The electronic base of the device
- Any integrated-coil pod unless its instructions specifically allow rinsing
The safest basic method is to use a dry cotton swab for the contacts and a soft cloth for the exterior.
Parts That May Be Rinsed
Depending on the product instructions, washable components may include:
- An empty removable tank
- The tank glass
- A detachable mouthpiece
- Non-electronic metal components
- An empty separate-coil pod after removing the coil
Do not assume that every pod can be washed. Some pods permanently contain cotton and an integrated coil.
Quick Daily Cleaning Method
This method is suitable when you notice light condensation or while refilling the pod.
Step 1: Switch Off the Device
Switch off or lock the device when it has a firing button.
Do not press the firing button while removing the pod or cleaning the contacts.
Step 2: Remove the Pod
Pull the pod out gently and keep the device upright.
Place the pod on a dry tissue to prevent liquid from reaching the work surface.
Step 3: Wipe the Bottom of the Pod
Clean:
- The pod base.
- Metal contact areas.
- Outer edges.
- Droplets around the airflow openings.
Do not force tissue deeply into small openings.
Step 4: Clean the Device Compartment
Use a dry tissue or cotton swab to clean:
- The pod compartment.
- The contact points.
- Interior edges.
- Visible condensation.
Step 5: Inspect the Pod
Look for:
- Cracks
- An open or damaged filling seal
- A broken mouthpiece
- Deformation around the pod base
- Continued leaking
- Burnt residue or unusually dark liquid
Step 6: Reinstall the Pod
Do not reinstall it until both the pod base and contact points are dry.
After installation, confirm that the pod sits securely and that the device detects it correctly when a display is available.
How to Clean the Device Body
Exterior Cleaning
Use a soft, dry cloth to wipe:
- The sides of the device
- The screen
- The buttons
- The device base
- The area surrounding the charging port
For a sticky mark on the exterior, a cloth that is only very lightly damp may be used when necessary, provided no moisture reaches the openings, buttons or charging port.
Wipe the device dry immediately afterward.
What Should You Avoid?
- Do not spray liquid directly onto the device
- Do not place it under a running tap
- Do not immerse it in a container
- Do not use alcohol or cleaners unless the manufacturer specifically allows them
- Do not clean the device while it is connected to a charger
- Do not activate it while visible moisture remains
How to Clean the Pod Compartment and Contact Points
The contact points transfer power and allow the device to detect the pod or coil.
Correct Method
- Remove the pod
- Disconnect the charging cable
- Use a dry cotton swab
- Pass it gently over the contact points
- Remove liquid from the surrounding edges
- Inspect the contacts for bending or visible damage
- Leave the compartment open briefly when moisture is present
- Reinstall the pod only after everything is dry
Keeping the contacts clean and dry is especially important when the device does not recognise the pod or coil.
Do Not:
- Scrape the contacts with metal
- Force spring-loaded contact pins downward
- Pour cleaning liquid into the compartment
- Push tissue deeply enough to leave fibres behind
- Activate the device during cleaning
How to Clean the Mouthpiece and Airflow Channel
Condensation can collect inside the mouthpiece and may eventually cause gurgling or droplets reaching the mouth.
Detachable Mouthpiece
When the mouthpiece is a separate component and its instructions permit rinsing:
- Remove it from the device or tank
- Rinse it using lukewarm water
- Wipe it with a clean cloth
- Leave it to dry completely
- Reinstall it only when no moisture remains
Mouthpiece Built into the Pod
- Wipe the exterior with a clean tissue
- Use the corner of a dry tissue to absorb nearby droplets
- Do not push water into the pod
- Do not insert an object deeply enough to contact the coil or cotton
- Replace the pod when it is cracked or continues leaking
How to Clean an Integrated-Coil Pod
In this type of pod, the coil and cotton are permanently built into the cartridge.
Suitable Cleaning
You can generally:
- Wipe the external surface
- Clean the bottom of the pod
- Wipe the outside of the mouthpiece
- Remove condensation from the pod base
- Clean around the filling seal
- Empty old liquid when the pod design allows it
Can the Pod Be Washed with Water?
Do not assume that every integrated-coil pod is washable.
Water entering the cotton and coil may:
- Dilute the remaining e-liquid
- Affect the flavor
- Require an extended drying period
- Leave hidden moisture inside the pod
- Fail to repair burnt cotton
Some product instructions may permit rinsing a removable mouthpiece, but that does not mean the complete pod or its integrated coil should be immersed.
Always follow the instructions for the specific model.
When Should You Replace the Pod Instead of Cleaning It?
Replace it when you notice:
- A crack in the liquid chamber
- A persistent burnt taste
- A clear decline in flavor
- Repeated leaking from the pod body
- A damaged filling seal
- The pod no longer fitting securely
- Abnormal discoloration of the cotton or liquid
How to Clean a Separate-Coil Pod or Tank
When a tank can be dismantled and uses a separate coil, its non-electronic parts may be suitable for rinsing.
Step 1: Remove the Tank
Switch off the device and separate the tank from the battery section.
Step 2: Empty the Liquid
Dispose of remaining e-liquid according to the product instructions and keep it away from the device, children and pets.
Step 3: Remove the Coil
Take out the coil before rinsing the tank.
Do not wash a coil in an attempt to restore burnt cotton.
Step 4: Disassemble Removable Parts
These may include:
- The mouthpiece
- Top cap
- Glass chamber
- Tank base
- Removable sealing rings
Keep the components arranged in order so that reassembly is easier.
Step 5: Rinse Permitted Components
Use lukewarm water rather than very hot water.
Avoid strong cleaners that may leave residue or damage rubber seals.
Step 6: Dry Everything Completely
- Remove excess water
- Wipe the components with a soft tissue
- Leave them in a clean place until completely dry
- Inspect corners, threads and sealing rings before assembly
Because a vape device contains electrical components, washed tank parts must be fully dry before they are reattached.
Step 7: Reassemble the Tank
After everything is dry:
- Inspect the sealing rings
- Reinstall the glass and base
- Insert a suitable working coil
- Fill the tank
- Prime the coil and allow it to absorb the liquid
- Reattach the tank to the device
Can a Vape Coil Be Cleaned?
It depends on what is meant by cleaning.
The exterior of a removable coil can be wiped after removal, but washing it does not reliably restore burnt cotton to its original condition.
Replace the Coil When:
- It produces a burnt taste
- The cotton is extremely dark
- Flavor remains weak
- Vapor production has dropped
- Leaking continues despite correct installation
- Its performance indicates that it has reached the end of its useful life
Replacing a burnt pod or coil is generally more reliable than attempting to reuse it.
How to Clean the Charging Port Safely
The charging port is sensitive and must remain dry.
Basic Cleaning
- Disconnect the charging cable
- Switch off the device
- Inspect the port under good lighting
- Remove surface dust with a soft, dry brush
- Do not insert metal tools
- Do not use liquid or a wet tissue
- Do not charge the device while moisture is present
When removing lint, work very gently and avoid pressing against the internal charging contacts.
When Should You Stop Using the Charging Port?
Stop charging the device when you notice:
- Liquid inside the port
- Rust or discoloration
- A burnt smell
- Unusual heat
- A loose or broken internal component
- The cable no longer fitting normally
- Sparking or repeated interruptions during charging
What to Do If Liquid or Water Enters the Device
When liquid enters the device rather than remaining on the exterior:
- Switch it off immediately
- Disconnect the charging cable
- Remove the pod or tank
- Wipe away external liquid
- Place the device in a dry, well-ventilated area
- Do not press the firing button to test it
- Do not attempt to charge it
- Consult the manufacturer’s support instructions or a qualified technician
Liquid reaching the internal components or circuit board may cause faults, error messages or unsafe operation.
Do Not Use Rice
Placing the device in rice does not guarantee that internal moisture will be removed, and dust or small particles may enter the charging port and openings.
Do Not Apply Strong Heat
Do not place the device:
- In an oven
- Beneath a very hot hair dryer
- Directly on a heater
- In direct sunlight
- Inside a closed vehicle
Do not attempt to reactivate the device when it produces unusual heat, a burnt smell or visible signs of damage.
How Often Should You Clean a Vape Device?
There is no single cleaning schedule suitable for every user.
After Each Refill
Check:
- The filling seal.
- The bottom of the pod.
- The pod compartment for droplets.
- The cleanliness of the mouthpiece.
Every Few Days
Wipe:
- The contact points
- The pod compartment
- The exterior of the device
- Condensation near the airflow openings
Perform a More Thorough Cleaning When:
- The flavor changes
- You replace the coil
- You change to a different e-liquid
- Gurgling repeatedly occurs
- The pod starts leaking
- The device cannot detect the pod
- Sticky residue becomes visible
Frequent users may need light cleaning more often than occasional users.
Common Cleaning Mistakes
Washing the Device Body with Water
Water may reach the battery or electronic circuits.
Cleaning the Device While It Is On
An accidental button press may activate the coil.
Using a Wet Tissue Inside the Pod Compartment
This may introduce additional moisture to the contacts instead of removing e-liquid.
Reassembling Components Before They Are Dry
Remaining water can affect flavor and electrical contact.
Using a Needle or Metal Tool
Metal can scratch components or create an electrical short.
Attempting to Wash a Burnt Coil
Cleaning cannot repair cotton that has already burnt.
Ignoring the Filling Seal
The device may look clean while leaking continues because the seal is open, damaged or incorrectly positioned.
Confusing Condensation with Leaking
One small droplet does not necessarily mean that the pod is defective. Repeated liquid accumulation requires inspection.
Pushing Debris Deeper into the Charging Port
Rough cleaning may make the problem worse.
How to Reduce Condensation and Leaking
Do Not Overfill the Pod
Leave a small amount of air space and follow the filling line when one is provided.
Close the Filling Seal Properly
Confirm that the seal sits flat and is fully secured.
Store the Device Upright
Leaving some pod systems horizontally for extended periods may allow liquid to enter the airflow channel.
Avoid High Temperatures
Heat can expand the liquid and air inside a pod, increasing the risk of leaking.
Use Compatible Pods
Do not choose a replacement by appearance alone. Check the complete series, device model and resistance.
Do Not Draw Excessively Hard
A very strong draw may pull more liquid into the coil than it can vaporize, causing flooding and gurgling.
Leave Time Between Draws
This gives the coil enough time to manage the liquid without flooding or drying.
Replace Cracked Pods
Cleaning cannot repair a cracked liquid chamber or damaged filling seal.
Wipe Condensation Regularly
Do not allow liquid to remain around the contact points.
Frequently Asked Questions
Can I Wash a Vape Device with Water?
No. Never immerse the device body, battery or charging port in water. Use dry cleaning methods or, when permitted, a cloth that is only very lightly damp on the exterior.
Can I Wash a Vape Pod?
It depends on the pod design. Do not wash a pod containing an integrated coil unless the manufacturer specifically permits it. Some empty, removable components may be rinsed after the coil is removed.
How Do I Clean E-Liquid from Beneath the Pod?
Remove the pod, then wipe its base, the device compartment and the contact points using a dry tissue or cotton swab. Reinstall the pod only when everything is dry.
Does Liquid Beneath the Pod Mean It Is Leaking?
Not always. A limited amount may be condensation. A genuine leak is more likely when liquid repeatedly collects, quickly returns after cleaning or lowers the pod’s liquid level.
How Can I Tell Condensation from a Leak?
Condensation is normally a small amount around the mouthpiece or pod base. A leak is usually larger or persistent and may wet the battery contacts or reduce the liquid level.
Can a Burnt Coil Be Cleaned?
The external surface may be wiped, but washing does not restore burnt cotton. Replace the pod or coil when the burnt taste continues.
How Do I Clean a USB-C Charging Port?
Switch off and disconnect the device, then use a soft, dry brush to remove surface dust. Do not use water, a wet tissue or a metal tool.
What Should I Do If Liquid Enters the Charging Port?
Switch off the device, disconnect the cable and do not attempt to charge it. Leave it in a dry, ventilated place and seek manufacturer support when moisture, heat or an unusual smell continues.
Can I Clean the Contacts with Alcohol?
Do not apply a cleaning substance before checking the manufacturer’s instructions. The safest standard method is a dry cotton swab, as some liquids may affect coatings or seals.
Why Does Condensation Return After Cleaning?
A limited amount can form naturally during use. Wipe it regularly and avoid overfilling, drawing too hard or leaving the pod loosely installed.
Why Does the Device Not Detect the Pod After Cleaning?
Check that:
- The contacts are completely dry
- The pod is fully installed
- Any protective sticker has been removed
- The contact pins are not bent
- The pod is compatible
- The pod is not damaged
How Often Should I Clean My Vape Device?
Inspect beneath the pod whenever you refill it, wipe condensation whenever it appears and clean the contacts regularly. The exact frequency depends on use and how quickly moisture collects.
Conclusion
Correct cleaning does not mean washing the complete device.
Remove the pod, wipe away condensation, clean the contacts and inspect the filling seal and pod body for damage. When leaking continues or the pod is cracked or produces a burnt taste, replacement is usually better than trying to repair a worn component.
Quick Summary
- Clean the device body and battery using dry methods
- Remove the pod before cleaning the contact points
- Never immerse a vape device in water
- Do not place metal tools inside the device
- A few droplets do not always indicate a leak
- Inspect the pod and filling seal when liquid repeatedly collects
- Do not wash an integrated-coil pod unless its instructions permit it
- Remove the coil before rinsing a compatible removable tank
- Allow washed components to dry completely before reassembly
- Never charge a device when liquid has entered the charging port
- Replace cracked pods and burnt coils instead of trying to repair them
- Store the device upright and away from direct heat
Read Also
Important Notice
This content is educational and intended for adults only.
Vaping products are not risk-free, and e-liquids may contain addictive nicotine. Keep devices, liquids, pods and coils away from children and pets. Clean spilled liquid immediately, wash exposed skin and follow the manufacturer’s instructions.